
An Introduction to Using the Command Line
Interface (CLI) to Work with Files and Directories
Mac OS
by bertram lyons
senior consultant
avpreserve
AVPreserve | Media Archiving & Data Management Consultants
350 7th Avenue, Suite 1605 | New York, New York | 10001
917.475.9630 | www.avpreserve.com | info@avpreserve.com

Every computer operating system has a different mechanism for communicating commands.
Windows is the well known operating system for Microsoft machines; MAC OS is the Apple
operating system, which itself is similar to UNIX/LINUX and other ?NIX operating systems. Each
system requires a different syntax to communicate commands, although mostly all operating
systems allow the same functions to be performed, even if the syntax differs.
In this demonstration, I’ll be focusing on how to work with command line on your MAC OS, but
it actually can be applied to most UNIX/LINUX interfaces as well. If you work on a PC, you can
search online for the analogous MS DOS commands and attempt to use them in the MS DOS
command prompt.
Open Terminal
The Terminal is a program included with all versions of Mac OS X. It is located in the Utilities
folder within the Applications folder. When launched, it provides a command line interface (CLI)
to control the underpinnings of the UNIX based operating system.
a Few Basics
When the Terminal is rst opened, a message similar to the following appears:
Last login: Fri Aug 29 14:49:37 on ttys000
Bertrams-MacBook-Air:~ bertramlyons$
Line 1 shows the last time the Terminal was used. If the date or last connection is unfamiliar, it
could indicate someone has unwanted access to your computer.
Line 2 is the prompt, or command prompt. It shows the machine name (Bertrams-MacBook-Air),
a colon, the present working directory (~) a space, the current user (bertramlyons) and a dollar
sign (or a hash (#) if the shell has super user privileges).
The currenT DirecTOry
The current directory, also known as the working directory, is where you are. In the Finder, this
is equivalent to having a window open and viewing the les. To determine the current directory,
Introduction
1
Using the Command Line Interface: Mac OS
Using the MAC OS
Terminal Interface
type pwd after the prompt, which produces an output similar to this:
Bertrams-MacBook-Air:~ bertramlyons$ pwd
/Users/bertramlyons
pwd stands for “print working directory”, and will likely output “/Users/(yourusername)” if you
enter it upon rst opening Terminal.
You may also notice that the current directory is displayed in a dierent form in the prompt. In
this case, “~” is equivalent to “/Users/bertramlyons”, the home folder.
Listing the Current DireCtory
To see what is contained in the current directory, you can use a list command (ls) with additional
options, -a (all les and directories, including hidden), -l (output as a true structured list), -R (list
recursively through all directories and les within the current directory). For example, the generic
ls command yields a columnar list of directories and les:
Bertrams-MacBook-Air:~ bertramlyons$ ls
Applications Movies bert
Creative Cloud Files Music bin
Desktop Pictures index.html
Documents Public social-feed-manager
Downloads Tresors test1.txt
Library bagger websites
Adding the -l option to the ls command will give you more structured output (with more
information, too):
Bertrams-MacBook-Air:~ bertramlyons$ ls -l
total 72
drwx------ 3 bertramlyons staff 102 Apr 9 14:06 Applications
drwx------@ 3 bertramlyons staff 102 Jun 26 08:03 Creative
Cloud Files
drwxr-xr-x+ 25 bertramlyons staff 850 Sep 2 09:41 Desktop
drwx------+ 7 bertramlyons staff 238 Aug 23 23:41 Documents
drwx------+ 55 bertramlyons staff 1870 Sep 2 09:26 Downloads
drwx------@ 55 bertramlyons staff 1870 Jun 6 08:11 Library
drwx------+ 5 bertramlyons staff 170 Jul 16 10:25 Movies
drwx------+ 5 bertramlyons staff 170 Feb 21 2014 Music
drwx------+ 7 bertramlyons staff 238 Aug 23 23:41 Pictures
drwxr-xr-x+ 6 bertramlyons staff 204 May 6 21:17 Public
drwx------@ 5 bertramlyons staff 170 Aug 22 15:02 Tresors
drwxr-xr-x 6 bertramlyons staff 204 May 7 15:11 bagger
drwxr-xr-x 2 bertramlyons staff 68 Jun 4 10:48 bert
drwxr-xr-x 17 bertramlyons staff 578 May 11 23:02 bin
-rw-r--r-- 1 bertramlyons staff 14500 Apr 28
13:22 index.html
drwxr-xr-x 9 bertramlyons staff 306 May 11 23:04 social-feed-
manager
-rw-r--r-- 1 bertramlyons staff 18696 Apr 28 09:13 test1.txt
drwxr-xr-x 4 bertramlyons staff 136 May 6 21:17 websites
2
Using the Command Line Interface: Mac OS
Here you can see the permissions settings for each le/directory in the rst column on the left.
“drwxrwxrwx” is the most you’ll see. The “d” identies the object as a directory. If there is a “-”
where the “d” is supposed to be, that identies the object as a le. Following the rst character,
there is the potential for three sets of the characters “rwx”. On le systems there are three types
of users who can be assigned permissions: Owner, Group, EveryoneElse. Each trio of “rwx”
characters represents one of the three entities above, in the same respective order. Also, three
types of permissions can be documented for a given le/directory: Read, Write, Execute (rwx).
So, for each le directory, the permissions documentation tells you:
• If it is it a le or directory
• Whether the owner can read, write, and/or execute
• Whether the people in a certain group can read, write, and/or execute
• Whether everyone else who comes into contact with it can read, write, and/or execute
In the ls -l results you can also see things such as the owner (bertramlyons), the group that the
le is part of (sta), the lesize, and the date last modied.
Adding the -a or -R option to the ls command will give you much more; -a reveals any hidden
les, -R reads recursively through all directories. Try it for yourself.
Bertrams-MacBook-Air:~ bertramlyons$ ls -a -l -R
The ls command has many, many options, and is worth learning. For example, ls -F will postx a
slash (/) on every directory and an asterisk (*) on every executable le.
Changing DireCtories
Now that you can see what is in your current directory, you may decide to navigate to a dierent
directory. To change the current directory, use the cd command, as in:
Bertrams-MacBook-Air:~ bertramlyons$ cd Documents
Bertrams-MacBook-Air:Documents bertramlyons$ pwd
/Users/bertramlyons/Documents
You are now in your Documents directory, just as if you had double clicked on the Documents
folder in the Finder. Note how the prompt has changed to include the path “~/Documents”.
Remember, you can get a list of all the documents in this directory with the ls (list) command:
Bertrams-MacBook-Air:Documents bertramlyons$ ls -l
total 11136
-rw-r--r-- 1 bertramlyons staff 5698278 Mar 18 12:56 FileZilla_3.7.4.1_
i686-apple-darwin9.app.tar.bz2
drwxr-xr-x 6 bertramlyons staff 204 Jun 6 12:55 Microsoft User Data
drwxr-xr-x 2 bertramlyons staff 68 Jan 14 2014 WebEx
There are two directories and one le in my Documents folder.
Using the cd command has many options and shortcuts. The example above uses the cd
command to move into a directory that is within the current working directory. That is why we
3
Using the Command Line Interface: Mac OS
could type: cd Documents. The system looked for a directory in the current working directory
named Documents. You can also use global paths to change to any directory in the le system.
For example, I may want to change directly to a directory on my desktop called desktop:
Bertrams-MacBook-Air:Desktop bertramlyons$ cd /Users/bertramlyons/
Desktop/desktop
Bertrams-MacBook-Air:desktop bertramlyons$ pwd
/Users/bertramlyons/Desktop/desktop
By typing in the global path, I was able to move directly to the desired directory.
There are shortcuts that you can use as well in combination with cd:
• “cd ~” will always take you directly to your home folder (for a given user)
• “cd ..” will always take you up a step in the hierarchy (or back a step) of the root le
structure
Give it a try. You can always use pwd to see where you are.
DirecTOry managemenT
You can use the CLI to create and delete directories just as you would use the Finder on
your computer. The words ‘directory’ and ‘folder’ are often used interchangeably to identify
organizational structures in a le system. You can place other directories or les within a
directory. The command used in this case is called mkdir.
Bertrams-MacBook-Air:Desktop bertramlyons$ mkdir TestDirectory
This command creates a new directory on my Desktop called “TestDirectory.” The mkdir
command by default creates a directory at the current working directory. Be sure you know
where you are currently if you intend to create a directory without providing a global path. If I
want to create a directory at a very specic location, then it is best to use the entire path in your
mkdir command:
Bertrams-MacBook-Air:~ bertramlyons$ mkdir /Users/bertramlyons/Desktop/
TestDirectory2
These two commands both produced new directories on my Desktop with the specied names:
Bertrams-MacBook-Air:Desktop bertramlyons$ pwd
/Users/bertramlyons/Desktop
Bertrams-MacBook-Air:Desktop bertramlyons$ ls
TestDirectory
TestDirectory2
Now you may also want to delete a directory from your lesystem. Anytime you talk about
deleting in your CLI, things get a little scary. Don’t be afraid, just learn to be very careful about
using delete commands. To remove a directory, we use the command, rmdir. The following two
commands do exactly the same thing (as long as my current working directory is my Desktop):
4
Using the Command Line Interface: Mac OS

Bertrams-MacBook-Air:Desktop bertramlyons$ rmdir TestDirectory
Bertrams-MacBook-Air:Desktop bertramlyons$ rmdir /Users/bertramlyons/
Desktop/TestDirectory
It is always safer to be very specic when using a delete command. I always use the second
example because it is less likely to cause problems if I mistype something or if my current
working directory is different than what I think it is. To be even safer, I always use the pwd
command before I do anything to les or directories. Then I always know where I am before I
assert a command.
Bertrams-MacBook-Air:Desktop bertramlyons$ pwd
/Users/bertramlyons/Desktop
Bertrams-MacBook-Air:Desktop bertramlyons$ rmdir /Users/bertramlyons/
Desktop/TestDirectory2
You can then use the ls command to verify that you deleted the directory as you intended.
Bertrams-MacBook-Air:Desktop bertramlyons$ pwd
/Users/bertramlyons/Desktop
Bertrams-MacBook-Air:Desktop bertramlyons$ ls
TestDirectory
Here it shows that I removed TestDirectory2 but not TestDirectory.
File managemenT
In similar fashion to directories, you can also create, delete, copy, and move/rename les with
the CLI on your computer. There are also editing options for some le types, but this tutorial does
not cover that advanced step.
creaTe Files
The easiest le to generate from the CLI is a standard text le. There are a couple of ways to
create a le using the command line. One option is to echo or print text and to have that text
export to a le. This can be used very simply to get a le started. For example:
Bertrams-MacBook-Air:Desktop bertramlyons$ printf ‘Test.’ > testle.txt
In this example, we use the printf command to print some type of text, in this case: ‘Test.’. Notice
that we use single quotes to surround the text we want to print. This tells the computer that this
is a text block and to ignore the content within the quotes. The “>” character is a command that
tells the system to write the results of the previous command to a new le. In this case, we are
asking it to write the results of our printf command to a le called testle.txt. Since testle.txt
does not already exist, it will create a new le with that name. And remember, here it is defaulting
to create the new le at the current working directory, which happens to be my desktop. You
could be more specic and include the entire path of the le you want to create:
Bertrams-MacBook-Air:Desktop bertramlyons$ printf ‘Test.’ > /Users/
bertramlyons/Desktop/testle.txt
5
Using the Command Line Interface: Mac OS
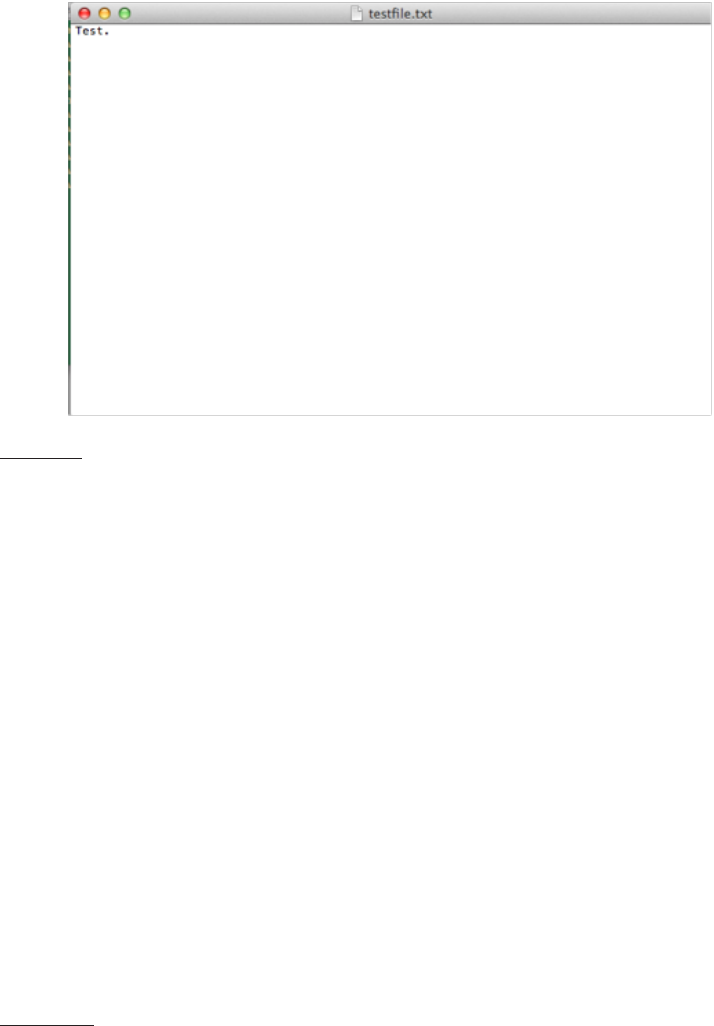
Both of the above commands create a text le called testle.txt on my desktop. When I open the
le, I can see that it is a basic text le with the only contents being “Test.”:
Open Files
You might want to open the le from the command line in order to check that you created it
correctly. You can use one of two easy options to do so. The open command opens the le just
as if you had used a browser to open the le. It selects the default program to open the le type
based on the extension. In this case:
Bertrams-MacBook-Air:Desktop bertramlyons$ open testle.txt
or
Bertrams-MacBook-Air:Desktop bertramlyons$ open /Users/bertramlyons/
Desktop/testle.txt
Both of these commands will open the text le using the TextEdit program on your computer.
If you only want to read the contents of the le to verify it is what you think it is, you can also use
a command called cat. The cat command reads the text of the le directly into the CLI.
Bertrams-MacBook-Air:Desktop bertramlyons$ cat testle.txt
Test.
DeleTe Files
To delete a le from your computer, you can use a similar command to the one learned above for
deleting directories. The same caution should apply to deleting les, and you should always use
pwd before you delete to make sure you know where you are in the le system. You should also
use global paths to minimize risk.
Bertrams-MacBook-Air:Desktop bertramlyons$ pwd
/Users/bertramlyons/Desktop
Bertrams-MacBook-Air:Desktop bertramlyons$ rm /Users/bertramlyons/
Desktop/testle.txt
6
Using the Command Line Interface: Mac OS

This rm command removed my testle.txt from my computer.
cOpy Files
Copying les is the process of making an exact copy of a le in a separate location on the
le system. At the end of the process, there are two les, when originally there was one. The
command, cp, has a syntax much like a sentence: copy what where. In the example below, I
create a new testle.txt on my Desktop and then make another copy in my Documents folder:
Bertrams-MacBook-Air:Desktop bertramlyons$ pwd
/Users/bertramlyons/Desktop
Bertrams-MacBook-Air:Desktop bertramlyons$ printf ‘Test.’ >/Users/
bertramlyons/Desktop/testle.txt
Bertrams-MacBook-Air:Desktop bertramlyons$ ls
testle.txt
Bertrams-MacBook-Air:Desktop bertramlyons$ cp ./testle.txt /Users/
bertramlyons/Documents/
Bertrams-MacBook-Air:Desktop bertramlyons$ cd /Users/bertramlyons/
Documents/
Bertrams-MacBook-Air:Desktop bertramlyons$ pwd
/Users/bertramlyons/Documents
Bertrams-MacBook-Air:Documents bertramlyons$ ls
testle.txt
mOve Files
Moving les is the process of renaming a le so that it (1) has a new name and lives in the same
location or (2) has a new path and therefore lives in a new location, or a combination of both.
At the end of the process, there is only one le. No copies are produced. For example, below I
create a new le called testle.txt on my Desktop and then move it to my Documents folder.
Bertrams-MacBook-Air:Desktop bertramlyons$ pwd
/Users/bertramlyons/Desktop
Bertrams-MacBook-Air:Desktop bertramlyons$ printf ‘Test.’ >/Users/
bertramlyons/Desktop/testle.txt
Bertrams-MacBook-Air:Desktop bertramlyons$ ls
testle.txt
Bertrams-MacBook-Air:Desktop bertramlyons$ mv ./testle.txt /Users/
bertramlyons/Documents/testle.txt
Bertrams-MacBook-Air:Desktop bertramlyons$ ls
Bertrams-MacBook-Air:Desktop bertramlyons$ cd /Users/bertramlyons/
Documents/
Bertrams-MacBook-Air:Desktop bertramlyons$ pwd
/Users/bertramlyons/Documents
Bertrams-MacBook-Air:Documents bertramlyons$ ls
testle.txt
The le testle.txt no longer exists on the Desktop. It has been moved to my Documents folder.
The mv command will overwrite les without warning. Before moving a le to a new destination,
it is important to be aware of any les at that destination that might accidentally be overwritten
7
Using the Command Line Interface: Mac OS
by the command. The mv command can be used very simply to rename les in given directories.
If I now want to change the name of testle.txt to prodle.txt, the mv command makes it easy.
First change directory to the directory where the testle.txt lives, then use the simple sentence
syntax of move what where:
Bertrams-MacBook-Air:~ bertramlyons$ cd /Users/bertramlyons/Documents
Bertrams-MacBook-Air:Documents bertramlyons$ ls
testle.txt
Bertrams-MacBook-Air:Documents bertramlyons$ mv testle.txt prodle.txt
Bertrams-MacBook-Air:Documents bertramlyons$ ls
prodle.txt
One essential use of these commands in a practical environment is having the ability to generate
le lists from received hard drives or digital collections of large le counts.
By combining a few of the commands covered above (in tandem with spreadsheet exercises
learned previously in this tutorial), you can easily walk away with a nice csv or excel spreadsheet
that lists the basic information about every le on your drive.
For example, assume you received a drive from a donor and you want to do a quick assessment
of the content without having to click around through every folder on the drive. If the drive is
visible by your computer (or a local networked computer), you can use the following commands
to get a listing. Imagine the drive is connected to your laptop:
First, open Terminal. Then use the pwd command to see where you are:
Bertrams-MacBook-Air:~ bertramlyons$ pwd
/Users/bertramlyons
Next, since all drives that connect to your mac laptop can be found in the path /Volumes, use the
cd command to change your working directory to Volumes and then use the ls command to see
what is there:
Bertrams-MacBook-Air:~ bertramlyons$ cd /Volumes
Bertrams-MacBook-Air:Volumes bertramlyons$ ls
Macintosh HD SIMPLETOUGH blyons_bu blyons_bu-1
Ok, good. Now we can see that there are four volumes: Macintosh HD (that’s the main hard
drive for my computer), SIMPLETOUGH (that’s the external drive I plugged in), blyons_bu and
blyons_bu-1 (those are backup volumes that I connect to virtually). In this case, I know I plugged
in the SIMPLETOUGH and that is the drive I’m after, so I’ll use a cd command to move to that
directory, and then I’ll use the ls command to see what is in it:
Bertrams-MacBook-Air:Volumes bertramlyons$ cd SIMPLETOUGH
Bertrams-MacBook-Air:SIMPLETOUGH bertramlyons$ ls
$RECYCLE.BIN System Volume Information
GJ segments afc2004004
Get_started_for_Mac.app edit.seam
Recycled
8
Using the Command Line Interface: Mac OS
Making Use
of These
Commands in a
Library/Archive
Environment

Ok, now the powerful part. The listing above just shows the top level of my drive. Some
directories, some les, but it’s not showing me everything on the drive. To do that I have to add
a “-R” to my ls command, which makes the command function recursively — that is it lists all
les and folders in all folders from the current working directory down. Since we have navigated
to the root of the hard drive, if we use the recursive list command from here it will list everything
on the drive. Furthermore, because there will be many les listed, I want to print the result of the
command to a text le on my computer so I can use that data elsewhere. So we’ll combine the ls
command with the > (print to le) command:
Bertrams-MacBook-Air:SIMPLETOUGH bertramlyons$ ls -alR >/Users/
bertramlyons/Desktop/SIMPLETOUGH_list.txt
Now, if go to my Desktop, I’ll see the new SIMPLETOUGH_list.txt le. If I open it, I’ll have a
text le that lists all contents on my drive. And even better, the les are delimited in such a way
(with spaces) that I can import that .txt le into software such as Excel and use text-to-columns
functions to parse the data cleanly into columns. The sky is the limit after that!
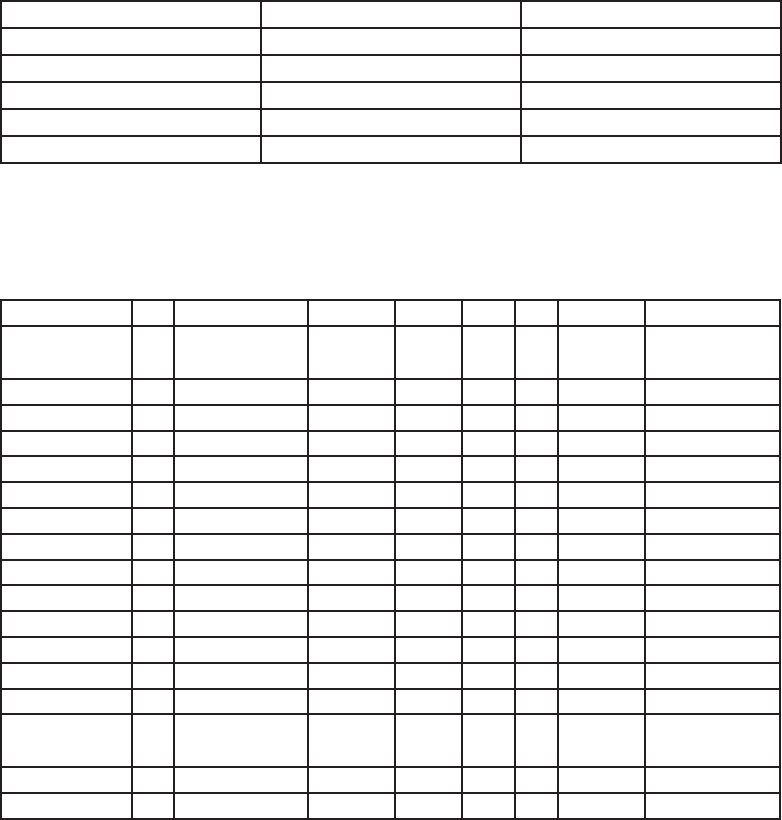
Following is a chart of the commands explained above in this tutorial.
Command Name Description
pwd Print working directory Returns the full path of the current directory in
which the CLI is reading.
ls List Lists the contents of the current working
directory.
cd Change directory Changes the current working directory to a new
location.
mkdir Make directory Creates a new directory.
rmdir Remove directory Deletes a specied directory.
printf Print Prints specied text.
> Print to le Prints the results of a command to a specied
le.
open Open Opens a specied le in the OS environment.
cat CAT Opens a specied le in the CLI environment.
rm Remove Deletes a specied le or les.
cp Copy Copies a specied le or les to a specied
destination.
mv Move Moves a specied le or les to a specied
destination
.
9
AVPreserve is a full service media archiving and data management consulting rm. We partner with Archives, Museums, Government Agencies,
Corporations, Media & Entertainment, and other organizations that create or collect media to help them manage, access, and preserve their
valuable assets and data. Our services address the full lifecycle of collections, from assessment and preservation planning for analog materials,
through project management of digitization efforts, to the various aspects of digital preservation and le management, including DAM selection,
taxonomy development, policy and workows, and development of software solutions supporting pr
eservation and access.
Using the Command Line Interface: Mac OS
Appendix -
Chart of
Commands
Discussed
